"All Corvettes are Red..." 12/1/2016

Here's another episode celebrating red C3s of different years.

From mild to wild, chromies to rubber bumper models.

Enjoy!

2016 Daytona Turkey Run

This year I was only able to attend the final day (Sunday) of the 2016 Daytona Turkey Run held at the Daytona International Speedway infield.

Between packing personal belongings while trying to find a new place to live, I simply had no time to devote to being there for all four days.

Fortunately, the 2017 Daytona Spring Turkey Run is only a few months away, as is the NCRS meet in Lakeland in January, so fun car events are always taking place somewhere in Florida.

This year I was not pre-registered for the Turkey Run, so I arrived at Gate 70 a few minutes before 7 a.m., along with about fifty others. At 7 a.m. sharp they let us in (after I paid the $20 last-day fee), and I found a good spot for my Vette.

Dual Exhaust Crossover Pipe

Over a year ago I had a local muffler shop install a new dual exhaust, including Dynamax mufflers. And they did a great, clean installation.

It is claimed by many that a dual exhaust increases horsepower (or at least overall performance) by reducing backpressure.

Not sure if that's actually a correct assumption and, frankly, I did not notice any difference as far as performance was concerned.

If a dual exhaust does help performance, that is great, but a true dual exhaust can also create other less-desirable issues, as I was going to find out.

Enter Exhaust Wavelength Resonating Frequencies, and you can end up with an annoying drone as it happened in my case.

Cars & Coffee @ Gateway Classic Cars Orlando 9/24/2016

This morning I drove the Vette down to Lake Mary for the monthly Cars & Coffee at Gateway Classic Cars of Orlando.

Great attendance as usual and here are a few pics of today's event.

The $10 Restoration

You don't need to look at the whole car when you think about restoration.

A car is nothing more than the sum of thousands of parts and, sometimes, breaking it down into small components is the smart thing to do.

Of course, a frame-off restoration is what we all want, and according to most current reality-TV shows, it can be done in a matter of weeks (if not days).

Well, some of those shows really qualify as science fiction, but I digress.

I can promise you one thing, though; if a project is small enough, you can do it in a matter of hours.

Rebuilding and Upgrading the Corvette L-48 Engine | Part 6

I took my Vette out yesterday (Sunday) for a longer test drive of approximately 30 miles.

The car performed beautifully although the idle seems to be a bit on the high side for my taste. That, of course, can be easily corrected so it's not a big deal.

Since I was told by Mark at Sunrise Automotive not to exceed 3000 rpm, I drove the car gently making sure the tach did not go over 2500 rpm. And everything was fine. That is until I was about a mile from home.

As I came to a stop behind another car at a traffic light, I thought that the car in front of me was making a lot of noise. But, as I made the right-hand turn to come home, I realized it was my car making the racket, which really sounded like a lifter gone bad.


At the next traffic light, I also noticed the car was running very rough and threatening to stall and die, so I made sure it kept running since I was less than a 1/4 mile from my house.

Rebuilding and Upgrading the Corvette L-48 Engine | Part 5

WEDNESDAY

Finally! After a few weeks of preparation and one delay (I was out of town for one week), my 1976 Corvette Stingray is back at Sunrise Automotive and the freshly rebuilt V8 is back home in the engine bay.


I am keeping my fingers crossed that I connected everything correctly when I detailed the wiring harness and that my steering column rebuild is up to the task.

Especially the ignition switch harmonica connector swap I was forced to make so everything would plug properly with the factory wiring harness.

C3 Corvette Magazine Ads

Regardless of who said it first, the axiom, "Nothing happens until someone sells something" applies to all products, Corvettes included. And to that end, Chevrolet has probably spent more money promoting their products than most of us will see in a lifetime.

So here is a small sampling of ads used in various magazines in the past, to promote C3 Corvettes of various years.


Rebuilding and Upgrading the Corvette L-48 Engine | Part 4

Even though Sunrise Automotive is closed on weekends, Mark (the shop's owner), decided to come in on Saturday for a few hours in order to start installing some of the parts that were powder coated by Topp Coat in Orange City, Florida.

He called me Saturday afternoon and asked me to come in to see something. Of course, my first question was, "What's wrong?" Well, thankfully nothing was wrong, but Mark felt that the a/c brackets looked horrible next to freshly powder coated parts. And they did.

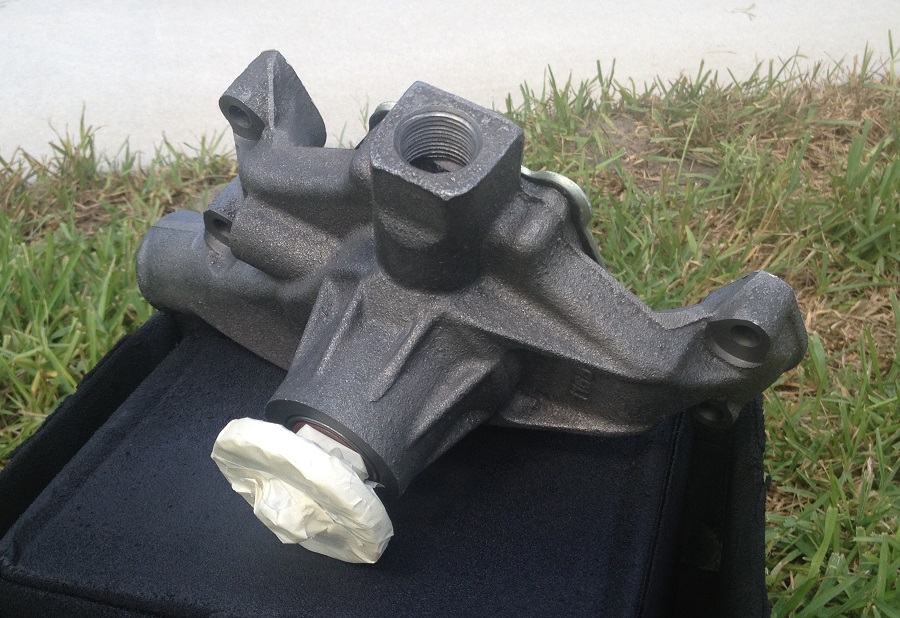
Above: Freshly powder coated a/c brackets are on the left side.

After I left Sunrise Automotive, I stopped by Topp Coat, and, luckily, John was there, so I explained that I'd have a few more parts needing gloss black powder coating on Monday. And of course, this would be a rush job since Mark wants the car to be done by mid-week.

John said that he'd do his best, and I am confident he can deliver.

Fast-forward to Tuesday and, after dropping off the a/c brackets yesterday, John called me today to let me know they were done. How's that for super-fast service!

I rushed them to Sunrise Automotive and John and Billy wasted no time getting them on the motor, and what a sight that motor is.

Blue Persuasion

With seductive paint names including LeMans, International, Mulsanne, Bridgehampton, Targa, and Bryar Blue Metallic—to name a few of the many blue paint shades available from 1968 through 1982 Corvettes—I had to include a selection of beautiful blue C3s that I've collected while web surfing.

Even though my '76 is red, blue has been one of my favorite colors for a long time and I've owned blue 1968 and 1971 Corvettes as well as a Medium Dark Royal blue 1984 Trans Am.

My daily driver is a 2006 Dodge Ram 1500, that I purchased because I loved the Atlantic Blue Pearl paint it came with from the factory.

This is my way to pay homage to blue C3 Corvettes.

Painting the Water Pump Chevy Orange

About a year-and-a-half ago I had the water pump replaced, but it recently developed a tiny seepage, so my mechanic recommended I get a new one.

Since this one came from Napa, it had a lifetime warranty, so today I got a brand new water pump. I had painted the previous one with cast metal paint which looks sort of okay. But now, since I want the rebuilt motor to look correct, I decided to paint it Chevy Orange.

First, I gave it a coat of VHT (Very High Temperature) primer followed by a couple of coats of VHT Chevy Orange. Once the last coat was dry, I gave it a final coat of VHT glossy clear, which matches the finish of the ceramic paint the shop used for the engine.

The "Made In China" Syndrome

A few weeks ago I installed a new coolant overflow tank and cap since the original parts were definitely showing their age. I also felt that a freshly rebuilt engine, along with a detailed firewall, justified a few new complementary parts.

So I installed the new tank and cap, as well as the necessary hoses.

Well, as I was looking under the hood today, I noticed that the overflow nipple had failed, even though there was no pressure applied to the cap or hose. My guess is that "strain" caused by the hose—as it angles down to drain excess coolant—caused the part to fail.

In hindsight, I guess I could've routed the hoses a bit differently to avoid undue stress on the part, but the original cap did not fail even after 40 years.

Rebuilding and Upgrading the Corvette L-48 Engine | Part 3

Mark at Sunrise Automotive called me this morning to let me know that the engine was back from the machine shop, in case I wanted to snap a few pics before they started spraying Eastwood Ceramic Chevy Orange on it.

I did, and glad I got to see it before they sprayed paint on it, as the motor looked squeaky clean with new water plugs and hardware. Mark—wanting to get it done—had already masked it so it was ready for paint.

2nd Annual Classic Car and Corvette Show
at Cecil Clark Chevrolet | Saturday, February 20, 2016

Back in late January, I registered for the Corvette and Classic Car show at Cecil Clark Chevy in Leesburg, about an hour's drive from my house.

And even though I thought I was early enough registration-wise, they only had a handful of spots available.

This show was well worth the drive out since they had a full house of Corvettes and lots of other interesting classic cars. About 230 total, and when you travel a bit out of town, you get to see cars you don't see at local events.

Really looking forward to the 3rd Annual show in early 2017.

Green with Envy

Green can be associated with positive or negative things.

A few examples that come to mind are, "The grass is always greener on the other side of the fence," "We got the green light," "I don't have a green thumb," or as in the title I chose for this post, "Green with envy."

Now to be "green with envy" is not necessarily a bad thing, as some of the dictionary definitions describe the idiom as: "Wishing very much that you had what someone else has," or possessing something that is "extremely covetous."

Hey, our paper currency is green, and we'd all love to have more of it, right?

So here's a selection of green C3 Corvettes that should get your jealousy juices going, but hopefully not in a negative way.

Detailing Gas Cap Door, Bezel and Hardware

There are areas that tend to accumulate lots of dirt and wax buildup over the years, and even though we do our best to keep these areas clean, sometimes the only way to really make them look their best is to take them off the car.

In the case of the gas tank door, it's an easy project that should not take more than an hour to do, provided all the components are there and in working condition. Tools required are a Phillips screwdriver, a car finish cleaner, wax, chrome polish, and clean microfiber rags.

I started by assessing the area and as the photos below show, you can see where dirt and wax have accumulated, plus the area indicated by the blue arrow below, where the paint was chipped.

Restoring Factory Exhaust Manifolds | Ceramic Coating

Back in January, I made a post about restoring the factory exhaust manifolds with Calyx Manifold Dressing. The product is a paste with the consistency of shoe polish, that must be brushed on with either a foam brush or an old toothbrush.

The results are quite good for an application that can be done in less than an hour with a cold engine.

Before Calyx

"All Corvettes are Red ..."

It's time for another episode of "All Corvettes are Red," brought to you by My 1976 Corvette Stingray Blog and other fine sponsors.

Okay, just me, but I do like red C3s and I hope you do as well.

Video: 1977 Corvette Restomod

This is a great video, featuring a 1977 Corvette that's been lightly restomodded.


I must admit that watching this video a while back, fanned the flames that ultimately motivated me to do something about having my 180-horse L-48 motor rebuilt and upgraded into the 300-plus-horse neighborhood.

Corvette Garage Decor

It seems that every time I stop by the local Hobby Lobby in Orange City, Florida, I manage to find something Corvette-related to bring home with me, and today was no exception.

While looking at a display of metal signs advertised at a half-off price, I found one that had a representation of both a '66 and a '76 Corvette Stingray, and even though the '76 was blue, it did not matter.


So I quickly parted with $20 plus sales tax and found a perfect spot in my garage for it.

Air Cleaner Assembly Powdercoated Gloss Black

I couldn't help myself, and I had to have the air cleaner assembly powder coated by the guys at Topp Coat in Orange City, FL.

Even though the assembly was done approximately only six months ago, the quality of the gloss black coating they use is impossible to resist, and they work fast and charge a fair price.

I dropped off the air cleaner assembly this past Friday and picked it up today, Tuesday, and I am so glad I decided to have this done.

And with these results, who can argue?

1973 Corvette Video Review

I happened to come across this nicely done video review of the 1973 Corvette Stingray, a model unique in its own way since it featured the then-new rubber front bumper with the traditional chrome rear bumpers, which was a one-year-only feature.


1973 Corvette Review from Discovery Bay Studios Weddings.

The car featured in this video is in beautiful condition and appears to be all original.

1976 Corvette Steering Column and the "Vega" Wheel
Part Ten (Final Chapter)

Thankfully, the light at the end of this tunnel was not an incoming train, and this is the last and final installment of my 1976 Corvette Steering Column and the "Vega" Wheel series of how-to articles, where I share how I rebuilt a 1978 Corvette steering column I found on Craigslist, mods I made, which parts I replaced, and the actual swap.

The project was actually started in December of 2015 when I spotted a 1978 Corvette steering column listed on Craigslist, for which I ended paying $65. Needless to say, the unit needed a LOT of work and many parts, as it had not been treated kindly by the previous owner(s). The first installment of the series was posted on Friday, January 1st of this year.


Incidentally, at the end of each installment, I've provided a direct link to the next chapter for those readers who want to easily follow the 10-chapter series.

Firewall and Engine Bay Detailing | Part 6

Glad to be done with sanding and painting, and happy to say that my Corvette's engine bay is 99% done!


Save for a few bolts to tighten down and a couple of wires to plug, this thing is ready for the few pieces that are getting powder coated and the freshly rebuilt engine to be dropped in.

I am very pleased with how the Dupli-Color Truck Bed Coating textured finish looks on the firewall, and the wiring cleaning and detailing turned out great, too.

Badass Corvettes

Unsure as to why classic race Corvettes were usually convertibles with a hardtop, but I just love that look. Another nice detail is the LeMans-style gas cap.


Pics of race or just badass Corvettes I find during my Internet travels.

Thank you for following my '76 Vette Blog!


Product Links... (#sponsored)

• How to Restore Your C3 Corvette: 1968-1982
• 1968-1982 Corvette Restoration Guide, 2nd Edition
• Corvette Black Book | 1953-2019
• 1976 Corvette Service & Overhaul Manual
• 1976 Corvette Service & Overhaul Manual CD-ROM
• 1976 Corvette Dealer Sales Brochure | GM-Licensed Reprint
• 1976 Corvette Stingray Owner's Manual | GM-Licensed Reprint
• 1976 Corvette Assembly Manual

1976 Corvette Steering Column and the "Vega" Wheel
Part Nine

I've been dragging my feet and—even though the 1978 OEM column I rebuilt has been done for a while—avoiding going through with the actual swap. But now that my car's motor is being rebuilt and I am done detailing the firewall and engine bay, the perfect time to start the swap has presented itself.

I started by reading one of the excellent Corvette steering column tutorials published by Jim Shea, which provided step-by-step instructions that allowed me to remove my car's column all by myself, in approximately an hour-and-a-half. It is safe to say that, with the engine in the car, the process would've taken at least an additional hour.


THE STEERING COLUMN REMOVAL PROCESS

The first thing I did was to remove the steering wheel and the plastic column cover under the dash. I also loosened the two bolts that secure the column to the dash, but as Shea recommends, I left everything in place.

Powdercoating by Topp Coat in Orange City, Florida

You never know for sure what results you'll get from a new shop, whether it's bodywork, paint or—as in this case—powder coating.

Well, the guys at Topp Coat in Orange City, Florida, did an incredible job with the parts I wanted powder coated. They turned out so nice and glossy, they really look like wet paint.

The only way to show how great they look is through photos, even though it is hard to really capture the full effect of the finish, but at least you'll get an idea.

On Stingray Pond

My grandma used to say, "God protect me from my friends, for I know who my enemies are." And it's obvious that the guy who let his "bud" borrow this 1971 Corvette Stingray—who ended up driving it into a marsh—could've used some of that advice.

Detailing Misc. Parts and Hardware

Mark from the shop called me early this morning to ask me if I could swing by the shop to pick up some hardware that, he felt, could use a good cleaning.

Well, "some hardware" were bags and bags of the original engine and engine accessory nuts, washers and bolts. I have to say that they did a beautiful job of tagging everything which speaks volumes in my book, as to how particular they are, and I am very pleased to see that.


But cleaning greasy and dirty hardware is not a fun job. Besides, after four decades and 40k-plus miles on them, age and stress take its toll, so I am going to clean and paint a few items, but when it comes to nuts, bolts, and washers, I plan to replace as many as possible with Grade 8 hardware.

Powder and Ceramic Coating

Small details make a huge difference when it comes down to detailing anything, and the motor is no exception. So today I stopped by Sunrise Automotive to pick up a few pieces that will be powder-coated gloss black by Topp Coat Powder Coating right here in Orange City, FL.

This morning I did a quick search for powder coating services near my home, and lo and behold, this shop is less than two miles from my house.

So I dropped off twelve pieces, including pulleys and brackets, which should be done in about a week. John, one of the shop owners, sent me a "before" photo of the parts inventory, which was great since I forgot to snap a few beforehand.


Unfortunately, I did not know that Topp Coat also offered ceramic coating, otherwise, I would've let them take care of the exhaust manifolds at the same time. Anyway, those are going to be done by Performance Kote of Orlando.

Firewall and Engine Bay Detailing | Part 5

Detailing and refinishing the firewall and inner fenders is a very tedious job, but I finally got to the point where every wire and hose was masked with heavy-duty aluminum foil.

Using tape and paper would take forever, so the aluminum foil approach works best.

Firewall and Engine Bay Detailing | Part 4

Since it's inevitable not to scratch a few areas of the hood surround lip, I will lightly sand it when I am ready to spray the firewall, and then give it a few coats of SEM Landau Black paint, at the very end.


Meanwhile, I continue to sand and fill in deep scratches with glazing compound, most of which is sanded off with 80-grit paper.

C3s on TV

If like me, you are a C3 enthusiast, there's no such thing as too much information, especially when it comes to videos and TV shows.

And there are plenty of videos on the web. A quick Google search for C3 Corvette videos, reveals over 89,000 links.

They run the gamut. From buying tips to restomods; from exhaust sounds to performance, and everything else imaginable in between.

Some of them are produced really well, but the great majority just plain suck!

But if you're looking for good and clean entertainment value, you can always turn to television.

Restoring the Shifter Console

Since I want to keep good records of work I've done to my car, I had to include the shifter console reconditioning I did a while ago.

The console itself is in okay condition, albeit showing its age. But since aftermarket replacement parts are expensive, I decided to keep the original console with the car for now and recondition things such as the shifter plate, replace the shifter boot and knob, and repaint the black edge of the plate.

1969 Stingray Convertible on CL. Too Good to be True?

A couple of days ago, while looking at C3 Corvettes offered on Craigslist (CL), I came across a 1969 Stingray Convertible that definitely caught my eye.

The ad did not list a specific city, but the map alluded to a Florida address about an hour away from me. Of course, the $10k asking price raised all kinds of red flags in my mind since prices for '69 Stingray convertibles powered by 427 c.i. big blocks, start at around thirty grand!

There was no phone number to contact the seller, only the cryptic CL email address. So I sent an email just to see if someone would respond.

Firewall and Engine Bay Detailing | Part 3

Since there's only so much that sanding alone will fix, I decided to use Bondo® Glass body filler to fill in and smooth out a few areas that looked horrible—thanks to someone at the factory using excessive amounts of seam sealer, and never bothering to make the area look halfway decent—especially around areas that are visible the moment you open the hood.

Once the body filler had cured, I sanded with 60-grit paper, and then applied a skimming coat of glazing putty, which might have been overkill since the bedliner spray will cover most sanding scratches.

Firewall and Engine Bay Detailing | Part 2

Today, I started by removing the engine bay hood lock assemblies, but I made sure I marked their exact location on the firewall, to make sure the hood will close and open (especially open) with no problems when I reassemble the whole thing.

I also tagged and bagged all related hardware to make my life easier during reassembly.


I then proceeded to sand the areas that will be painted, but I still need to Bondo® a few areas to make it look its best. And I plan to use bedliner spray for good coverage.

Firewall and Engine Bay Detailing | Part 1

Even though about a year ago I took the time to detail parts of the firewall (those I was able to reach), having the motor out of the engine bay gives me enough access to detail a good chunk of it.

This is by no means, a fun job. Quite the contrary. But it has to be done. Otherwise, what's the point of having a rebuilt engine that looks beautiful sitting in an engine bay that looks tired and dirty?

So with that thought in mind, I decided to start cleaning and sanding some of the areas I can reach. At some point, I will have to climb in the engine bay in order to mask everything that does not need paint, and I will also detail the chassis as much as I can.

Rebuilding and Upgrading the Corvette L-48 Engine | Part 2

Mark at Sunrise Automotive, sent me a couple of pics of the engine removal.

And—as promised—they made sure the fenders were protected while the operation was underway. You gotta love that.

Rebuilding and Upgrading the Corvette L-48 Engine | Part 1

By the early 1970s, "horsepower" had become a four-letter word in America thanks to the combined efforts of insurance companies, environmentalists, and the federal government, not to mention an oil crisis that quadrupled fuel prices.

So when the then-new 1976 Stingray models rolled off the line, they featured anemic 180 hp base motors with 8.5:1 compression ratios.

The "high-performance" L-82 option barely managed to bump that number up to 210 ponies.


The irony is that fuel efficiency was nothing to brag about either, with the L-48 being capable of only 13.6 highway miles-per-gallon.

For comparison purposes, the new 2016 Corvette has a 460 hp 6.2L V8 with an estimated 29 MPG, while the 2016 Camaro churns out 335 horses with a 27 MPG highway fuel efficiency out of the base 3.6L V6 engine!

Abandoned, Neglected and Forgotten | Early C3

Not enough there to determine if this is a '68 or a '69, at least from this photo, but one thing's for sure... this one is gone for good. And what a shame that is.

Rust in Peace!


Photos of neglected, abused, and abandoned Corvettes I find during my web travels.

Thank you for following my '76 Vette Blog!


Product Links... (#sponsored)

• How to Restore Your C3 Corvette: 1968-1982
• 1968-1982 Corvette Restoration Guide, 2nd Edition
• Corvette Black Book | 1953-2019
• 1976 Corvette Service & Overhaul Manual
• 1976 Corvette Service & Overhaul Manual CD-ROM
• 1976 Corvette Dealer Sales Brochure | GM-Licensed Reprint
• 1976 Corvette Stingray Owner's Manual | GM-Licensed Reprint
• 1976 Corvette Assembly Manual

Corvette Mystery Science Theater

'How many of God's laws
do these cars violate?'
Sometimes I come across images on the web of "modified" Corvettes that would make Crow T. Robot say, W. T. F!

The resulting byproduct of these mods range from absurd to comical to fugly to—in some rare instances—ingenious, but at the end of the day, 99% of them are just plain wrong!

Of course in this day and age of Photoshopped images, you never know which ones are legit.

Having said that; if you witness one of these Corvette-abuse cases in progress, please notify your nearest NCRS office.

Just kidding! Simply snap a few pics and share them with the rest of us.

If We Knew Then What We Know Now...

The old postulate that you don't make money when you sell a car but, rather, when you buy it, is evident when I read old Corvette magazines.

The October/November 1976 issue of Corvette News had a couple of interesting articles that talked about Corvette's values.

For example, Bob Wingate, a used Corvette dealer, talks about buying his first "classic" Corvette in 1965, when he purchased a 1954 Vette which he flipped for $1,000. That same car, according to the article, was worth $9,000 in 1976—or about $40 grand today.

Valve Covers: Back to an OEM Look

I decided to go back to the original look with the valve covers since I did not really care for how the Edelbrock Elite II's looked under the hood with every other component being period correct.

And so I first tried to reuse the original valve covers, which—my plan was—to paint the factory-correct Chevy Orange.

However, after having them bead blasted and hot tanked, I realized they were beyond being salvageable so I decided to look for used ones.


Corvette Station Wagons

Corvettes the Griswolds (National Lampoon's Vacation, 1983), would've loved.

And even though Vette Wagons are not my thing, I have to admit that a couple of them look pretty cool. Having said that, I am not going to buy one, regardless of price.

The Spirit of '76

As a teenager living in Milford, Utah back in 1976, I did not have the financial resources to own a Corvette. Even a beater.

But for reasons unknown, I walked in the local Western Auto parts store one morning and saw the new U.S.A. Bicentennial plate for sale.

Back in '76, there were tons of U.S. Bicentennial-related products available, but the commemorative tag was affordable and looked very cool in the eyes of a then, 16-year-old gearhead.

I can only imagine my plan was to use it for the car I was planning to purchase someday in the future, and it did grace the front bumper of my '71 Firebird Formula for a while, then my '78 Olds Omega.

After I sold that car, it sat on a shelf in my bedroom for many years.

But, unfortunately, after four decades and the many moves during that time, my U.S. Bicentennial plate was relegated to storage boxes and, eventually, lost.

A few days ago, by a fluke, I happened to come across one just like the one I used to own back in the day, or at least very similar, and I thought it would be great to have a period-correct accessory for my '76 Stingray.

And for only twenty bucks, it was an easy decision.


Thank you for following my '76 Vette Blog!


Product Links... (#sponsored)

• How to Restore Your C3 Corvette: 1968-1982
• 1968-1982 Corvette Restoration Guide, 2nd Edition
• Corvette Black Book | 1953-2019
• 1976 Corvette Service & Overhaul Manual
• 1976 Corvette Service & Overhaul Manual CD-ROM
• 1976 Corvette Dealer Sales Brochure | GM-Licensed Reprint
• 1976 Corvette Stingray Owner's Manual | GM-Licensed Reprint
• 1976 Corvette Assembly Manual

Adjusting the T-Top Panels

The gap between my T-tops was bugging the hell out of me. It was totally uneven being way wider at the front of the tops than at the rear.


I had to do something about it, and since I'd just replaced the weather rubber seals, what better opportunity to attempt this adjustment.

I say "attempt" since it is not as easy as it seems.

A Corvette by any Other Name...

A while back at a local cruise, I noticed a young boy and his dad admiring my Vette. Actually, the kid was the one doing the admiring (he was 8 or 10-years-old). His dad was busy looking at his smartphone.

Anyway, since the kid obviously liked my car, I asked him if he'd like to sit in the driver's seat so his dad could take a pic of him at the controls, to which he eagerly agreed.

Replacing T-Top Panel Weatherstripping

Time, weather conditions, dirt, and gravity will render any weatherstripping ineffective after a couple of decades, and the rubber seals on my '76's T-tops had hardened and become totally useless as far as being able to keep water out of the cabin.

And even though I do not drive my car when it's raining, you never know if you'll be caught in a downpour in Florida, so I needed the seals to work properly.

Removing old weatherstripping is not difficult; as long as someone hasn't gone crazy with weatherstrip adhesive. Luckily, my T-tops only had some under the window top metal trim channel.

And since there's no use for old weather seals, I did not care if the stuff came off in pieces.

Front Bumper Alignment and Bodywork | DONE!

It took three weeks to get the front bumper cover aligned with the nose and fenders, plus getting the whole front end and hood repainted so everything matched properly.

While my Corvette was having the bodywork done, I took the opportunity to have the nose emblem and the alarm switch shaved, and I am very pleased with the results.


The only issue I still have to deal with is hood alignment, but since I am planning to have the motor rebuilt (which would require hood removal anyway), I will see if the shop can manage to get it to align—and close—properly.